
Google Sheets is a powerful tool that allows users to create, edit, and share spreadsheets online. One of the key features of Google Sheets is the ability to merge cells. This can be useful for formatting purposes, creating headers, or simply making your data look more organized. Here is a step-by-step guide on how to merge cells in Google Sheets:
Table of Contents
Step 1: Open Your Google Sheet
To begin, open your Google Sheets in your preferred web browser. If you don’t have a Google Sheet yet, you can create a new one by going to the Google Sheets website and clicking on the “Blank” option or selecting a pre-made template.
Step 2: Select the Cells You Want to Merge
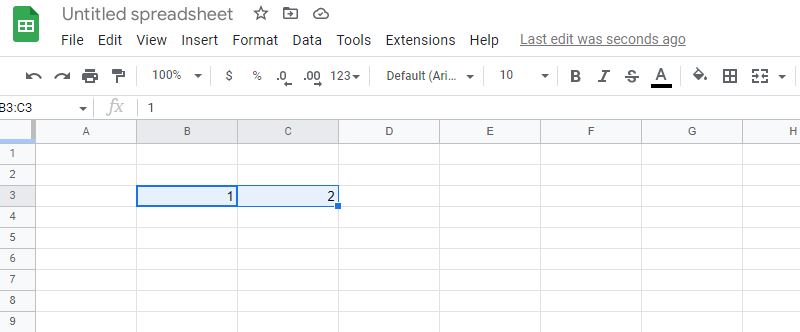
Next, select the cells that you want to merge. To select multiple cells, click on the first cell and then hold down the left mouse button while dragging the cursor over the cells you want to merge. If the cells you want to merge are not adjacent, hold down the Ctrl key on your keyboard while clicking on each cell you want to merge.
Step 3: Click on the “Merge cells” Icon
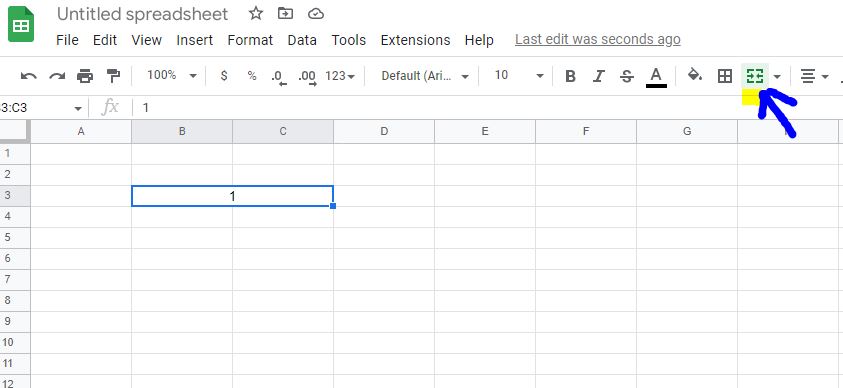
Once you have selected the cells you want to merge, click on the “Merge cells” icon in the toolbar. The “Merge cells” icon looks like two cells that have been merged together.
If you don’t see the “Merge cells” icon in the toolbar, you can click on the “More actions” button (three vertical dots) and then select “Merge cells” from the drop-down menu.
Step 4: Choose How You Want to Merge the Cells
When you select the “Merge cells” button, a submenu appears from which you can make your selection. This menu will give you several options for how you want to merge the cells. You can choose to merge the cells horizontally, which will combine the cells from left to right, or vertically, which will combine the cells from top to bottom. If you choose the option to merge all of the selected cells into one cell, the cells will be combined into one large cell with the contents centered.
Step 5: Click “Merge”
Once you have chosen the way you want to merge the cells, click on the “Merge” button to complete the process. The selected cells will now be merged together, and the contents of the upper-left cell will be preserved while the contents of the other cells will be deleted.
Step 6: Adjust the Formatting (Optional)
After merging cells, you may want to adjust the formatting to make your data look more organized. You can do this by selecting the merged cells and changing the font, alignment, or border settings.
Tips and Tricks:
- If you need to unmerge cells that you previously merged, simply select the merged cell and click on the “Unmerge cells” icon in the toolbar. This will separate the merged cell back into its original individual cells.
- When you merge cells, the contents of the upper-left cell are preserved, and the contents of the other cells are deleted. If you want to keep all of the data in the merged cells, you should first copy and paste the data into the upper-left cell before merging the cells. This way, you won’t lose any of the data that you want to keep.
- If you want to merge the contents of multiple cells into one cell without losing any of the data, you can use the “&” symbol in the cell formula. For example, if you want to merge the contents of cells A1, B1, and C1 into one cell, you can use the formula “=A1&B1&C1” in the merged cell. This will combine the text from all three cells into one cell, and you can adjust the formatting as needed.
Bottom Line
Merging cells in Google Sheets is a simple and powerful way to format your data and make it look more organized. By following these steps, you can quickly and easily merge cells in your Google Sheets spreadsheet.